Gomukhasana or Cow Face Pose

gomukhasana

Gomukhasana or Cow Face Pose

“Go” refers to “Cow” and “Mukha” refers to “face” so it is called Gomukhasana or Cow Face Pose. While performing this asana, this yoga posture resembles a Cow head. This asana is also one of the powerful asanas.

Stages

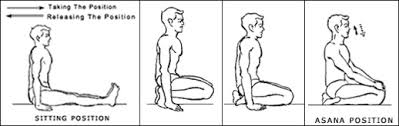
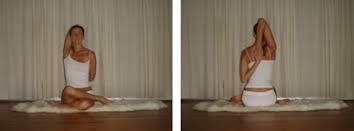
  1. Spread a cloth on the floor and sit on the floor with the legs extended in front of you.
  2. Fold your left leg and place it under the buttocks
  3. Fold your right leg and bend it such a way that the right knee rests on the left knee and sole of the right foot touches the lower part of the left thigh.
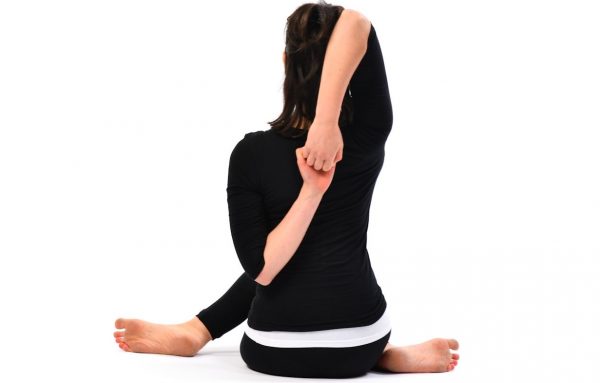
  4. Bend your left arm, bring it back and place behind the back by raising hand upward.
  5. Now bend your right arm from upward direction above the shoulders and place it on the back as far as it possible.
  6. Now try to touch the finger of each hands and eventually try to catch the hands as well.

Note:

  • Try to put your weight on the left side and balance your body
  • Be comfortable and constant
  • If fingers of both hands slip away, then try to touch once again and practice it regularly
  • Keep trunk and head straight. Breathe slowly
  • Perform the asana for two minutes in the beginning but gradually, you can extend the time till 15 minutes.

Benefits:-

  • Make the back flexible
  • Stimulates kidneys and treat diabetes, sciatica
  • Develop chest, lungs and heart.
  • Improve sexual ailments
  • Dissolve tumor in the axilla
  • Cures constipation, dyspepsia, loss of appetite, backache, arm- sprain.

Padmasana or Lotus Pose

yoga for weight loss

Padmasana or Lotus Pose

“Padma” denotes “Lotus” so it acquires its name from lotus. This asana is also called “Kamalasana”. It is cross-legged posture which is well suited for meditation and for reciting mantras. Padmasana is well suited for boys and girls.

Padmasana or Lotus Pose Stages:-

  1. Spread cloth on the floor and sit over it with the legs forward
  2. Now place your left foot on the right thighs and right foot on the left thigh. Some may start the process while keeping the right foot first. Either process is correct.
  3. Keep your left hand on the left knee and right hand on the right knee.
  4. Touch the tips of the indexed finger with the tips of thumbs.
  5. Keep your head, nose, spinal erect or straight. Breathe normally.

Note:

  • Eyes can be open or closed. But if you are seeking for meditation, it is better to keep your eyes close.
  • Some people may face problems while keeping both feet on the thighs. So one must have to practice with care.
  • Do not pressurize your legs too much to get the final position.
  • Beginner may keep in the final position for one or two minutes and eventually increase their time after practice.
  • Padmasana is well suited to perform in the morning

Padmasana or Lotus Pose Benefits:-

  • Keeps you physically fit, strong and fine
  • Reduces body weight and increase vitality
  • Normalize the blood pressure and controls the stress
  • Improves cholesterol level
  • Well useful for meditation, concentration, self realization
  • It stimulates the endocrine glands
  • Cure the disease like asthma, hysteria and insomnia

Sheershasana or Headstand

Sheershasana or Headstand

Sheershasana or Headstand

Sheersha denotes ‘head’ which is performed to make blood circulation better for head and eyes. This asana is treated as the king of all Asanas. Sheershasana or Headstand is also known as ‘kapaliasana‘. This asana needs huge practice to perform smoothly.

Stages:

  1. Spread a blanket on the floor and kneel on it. Put your hands on thighs.
  2. Place your top of the head on the floor and clasped your fingers behind the head to support the head between clasped hands.  Rest your forearms and elbows on the floor in a triangle shape to support your whole body.
  3. Bend your body forward, lift the hips, and straighten your knees as the figure shows. Concentrate on the body balance while doing so.
  4. Slowly walk the toes towards head, raise the leg slowly one by one. Try to put your whole body weight on the forearms and elbows. Bring your heels closer to buttocks and keep your back straight.
  5. Finally straighten the legs completely in the direction of the sky while keeping the body balance. Keep your feet, body; head and neck in relax position for seconds. Balance the weight between your arms and elbows.

While releasing from the above position, slowly bend your knees and keeps the toes on the floor while straightening the knees. Keep your knees on the floor and stay in child position for some seconds to get relaxed. Slowly raise your head opening the clasped hands. Sit properly and stand up slowly.

Note:

  • Bend in the above position as much as you can but not more than five minutes. Beginners are suggested to give five to fifteen seconds and expand the time to five minutes after practices.
  • Perform the exercise with empty stomach only.
  • Exercise can be performed twice a day i.e., Morning and evening.
  • Do not jump or fling so quickly. Perform each activity slowly and balancing the body.
  • Breathe in the normal way, through the nose only, not through the mouth.
  • A beginner may take the help of someone while raising the legs upward to balance the body.
  • This asana must not be performed in summers too much; it is more helpful for winters.
  • If the asana is performed for less time, one may keep eyes open. But if it is to be performed for long time, it is better to keep your eyes closed to enable to meditate.
  • Have relaxed at least for five minutes after performing the asana.
  • It should not be performed by those who are suffering from ear & throat infection, weak eyes, insomnia. Avoid doing at the time of mensuration, high blood pressure etc.

Benefits:

  • Increases blood circulation to head and eyes so strengthen the capacity of the sensory body parts such as head, eyes, ear, throat and nose.
  • Improves the memory power and enables to concentrate more.
  • It cures asthma, diabetes, headaches, migraines, imbalance etc.
  • It exhales the carbon dioxide and other harmful toxins from the lungs.
  • It brings the impure blood of lower body part to the heart which functions to make the blood pure and so generates clean blood to the lower parts.

Chakrasana or Wheel Pose

Chakrasana or Wheel Pose

Chakrasana or Wheel Pose

Chakrasana or Wheel Pose makes the body in half circle shape or spine twisted in semicircle shape, so this asana is called the Chakrasana. This asana resembles the rainbow as well.

Stages:

  1. Lie straight on the floor after spreading bed sheet or some cloth. Keeps your hands and legs straight.
  2. Slowly bend the knees and keeps your heels close to the respective buttocks.
  3. Slowly raise your hands, bend your arms at elbows and place your palm on the floor on either side of head, with the fingers pointing to the shoulders.
  4. Raise your body with the waist, buttocks. Tilt your head backward and lift the back body till your hands and legs go straight.

While releasing from the above position, move forward your feet and straighten your body downward. Slowly release your hands and keep straight towards leg and rest for some time.

Note:

  • Keep breathing slow, facial muscle soft, whole body relaxed.
  • Keep some distance between your feet to support your body.
  • People having spinal problems and cervical must avoid doing this.
  • One must not force his body to be more semicircular shape if your body is not flexible enough.
  • Beginners may keep in the same position for one minutes, but not more than this.

Benefits:

  • Makes the human spinal flexible and so make the human youthful for long time.
  • Removes neck and shoulder pain.
  • Increase abdominal efficiency by stretching the internal organs.
  • Strengthen the leg muscles
  • Relieves from the tension
  • Removes asthma and anxiety.

Vajrasana or Thunderbolt Pose

Vajrasana or Thunderbolt Pose

Vajrasana or Thunderbolt Pose achieves a firm and strong pose. It is easy to remain motionless so it is called “Vajrasana”. It is also called Diamond Pose due to its straight posture.

This has one exception compare to other asana as this asana can be performed anytime. This is mostly beneficial immediate after taking meal.

Stages:

  1. Spread a bed sheet and be in the sitting position.
  2. Bend your legs one by one at the knees and brings the foot under your buttocks.
  3. Bring your knees on the ground floor, apart your heels and sit between your heels. Sit is such a way that thighs rest on the whole legs and buttocks rest on the heels.
  4. Support your body through knees and ankles.
  5. Stretch your arms forward and keep straight on the respective knees. Maintain in the same position and breathe normally.

To release from this asana, first release your hands downwards, sit on the knees and then put your body weight on the toes with the help of hands. Straighten your legs and be in the sitting position again and relax for some time.

Note:

  • Keep your spine straight and close eyes while performing so.
  • People having joint pain must avoid this.
  • It can be performed for 20 minutes for more than this.
  • Do not keep your stand, keep buttocks only between the heels space.

Benefits:-

  • Helps improving digestion system and eliminates gas troubles.
  • Reduces the pain of knees, legs, feet, back and thighs.
  • Regular practice may avoid fever, constipation, stomach disorder, acidity, obesity.
  • Strengthen the sexual organs and helps to prevent urinary problems.
  • It is best for concentration, mediation
  • Brings peace in mind and so relieves from the stress